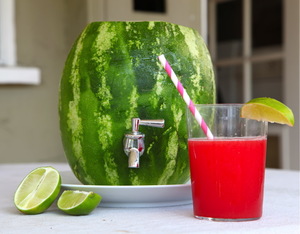
Watermelon Dispenser
Supplies
-Watermelon
-Faucet
-Knife
-Spoon
-Watermelon Juice (See Recipes)
-Drill (Optional)
Steps
1. Cut off the top of the watermelon.
2. Scoop out the fruit inside the watermelon.
3. Towards the bottom of the melon, screw the faucet through the rind. If that is to difficult you can drill through the rind with a drill.
4. Pour the juice you made with the fruit that you scooped out of the watermelon in the new dispenser! (You can also use any other liquid too put in)
5. Enjoy!!!
Duct Tape
Duct Tape Wallet
Supplies
-Duct tape
-Scissors or utility knife
-Ruler
-Pencil
Steps
1. Cut or tear four strips of duct tape, 10″ long. With the adhesive side up, adhere the duct-tape strips one to another with a 1/4″ overlap. You now have a sheet of duct tape 10″ by about 7″.
2. Make a second sheet.
3. Carefully stick the adhesive sides of the two duct-tape sheets together.
4. Cut or tear a 10″ strip of duct tape. Use a utility knife or scissors to make a small cut in the center of one end of the duct tape. This will help you tear the strip into two straight 1″ strips.
5. Fold and adhere the 1″ duct-tape strips to the 10″ ends of the sheet. This will make a smooth, clean finished edge.
6. Using the scissors or utility knife, trim the sheet to 9″ wide.
7. Fold the sheet in half.
8. Tear two 1″ x 4″ duct-tape strips using the process in Step 3. Fold and adhere the ends of the duct-tape wallet together. Trim the 4″ strips.
9. To make a pocket for your duct-tape wallet, cut two strips of tape 5″ long and stick the two pieces (adhesive sides) together.
10. Fold and adhere a 1″ strip onto the 5″ edge. Trim the pocket to 4″ long.
11. Using 1/2″ strips of duct tape, stick the pocket in place. Trim the strips.
Organizers
|

|
Notebooks
|
|
